At last -- the fun part. Start by applying the dye directly from the jars to the floss. Use eyedroppers or plastic spoons.

Observe and learn. You're working with fat little ropes of cotton floss, and if you paint in broad strokes from right to left, when you turn the skein over, it'll be white on the underside. But if you drop the dye in one area, it soaks through the skein to the bottom. Think about stitching with a skein of floss that is a solid dark color on one side, that is, for the first three or four yards, and . . . something else on the other, the last three or four yards. Mottling the color on the skeins is desirable, but you want to do it evenly. Experiment!


Change the colors by dropping the color direct from the jar onto the floss, then taking the same color and diluting it (Slightly? A lot? What's your pleasure?) and painting in between the dark colors.

If the contrast between the dark and light blotches is too garish for your liking, squeeze the wet skein and moosh it all together. The contrast will lessen as the dark and light areas all soak together. This is why you bought a two thousand yard cone of floss! Invest some of it in your education. Try this, try that, learn what works and what doesn't, what you like and what you don't like. You can't really judge dyed floss until the end of the process when it's completely dry, so you're sort of flying blind at this point. But experience will inform your work quickly.

When you're done painting the three skeins, look them over to be sure you haven't left any areas of pure white.

Then lay a sheet of paper towel over them and press to absorb the extra liquid. You don't want to take a dripping wet skein to the next step.

Put a clean paper towel on your plastic plate and lay your dyed skeins on it. Don't let the skeins touch each other, for they will stain. Be especially careful with pale colors next to dark colors.

Take your plate over to the prepared plastic wrap strips and lay a skein on each strip. When you touch the skein you may stain your glove fingers -- be careful not to transfer that color to the other skeins. Then return to your work station and dip your gloved hands in the pan of water at your feet; dry them with a paper towel and then use that wet paper towel to quickly swipe the surface of the plastic plate you've brought with you. Wipe off the glass or discard the sheet of waxed paper and take another. Lay out another three skeins of floss.
Once you've created a skein from each of the dye jar colors, it's time to mix colors. I'm going to leave this part to you and your imagination. Remembering how the color wheel works, mix and combine colors, streak with additional colors. Have fun. Remember not to make one side of the skein totally different from the other side -- let the dye soak through.

Here's a technique to try: Underdye with a common color. Here I've used pale yellow; khaki is another useful color. Blot the skein, then overdye with another color. The resulting skein colors will work together in a subtle way. This is especially useful for preparing sampler threads whose colors you want dulled down in a uniform manner.

When enough of your skeins have been dyed to fill the strips of plastic wrap you've laid out, it's time to wrap the skeins. Move the skein closer to one edge of the wrap and fold the wrap over it. Then, starting from one end, roll the skein to completely enclose it in the plastic.
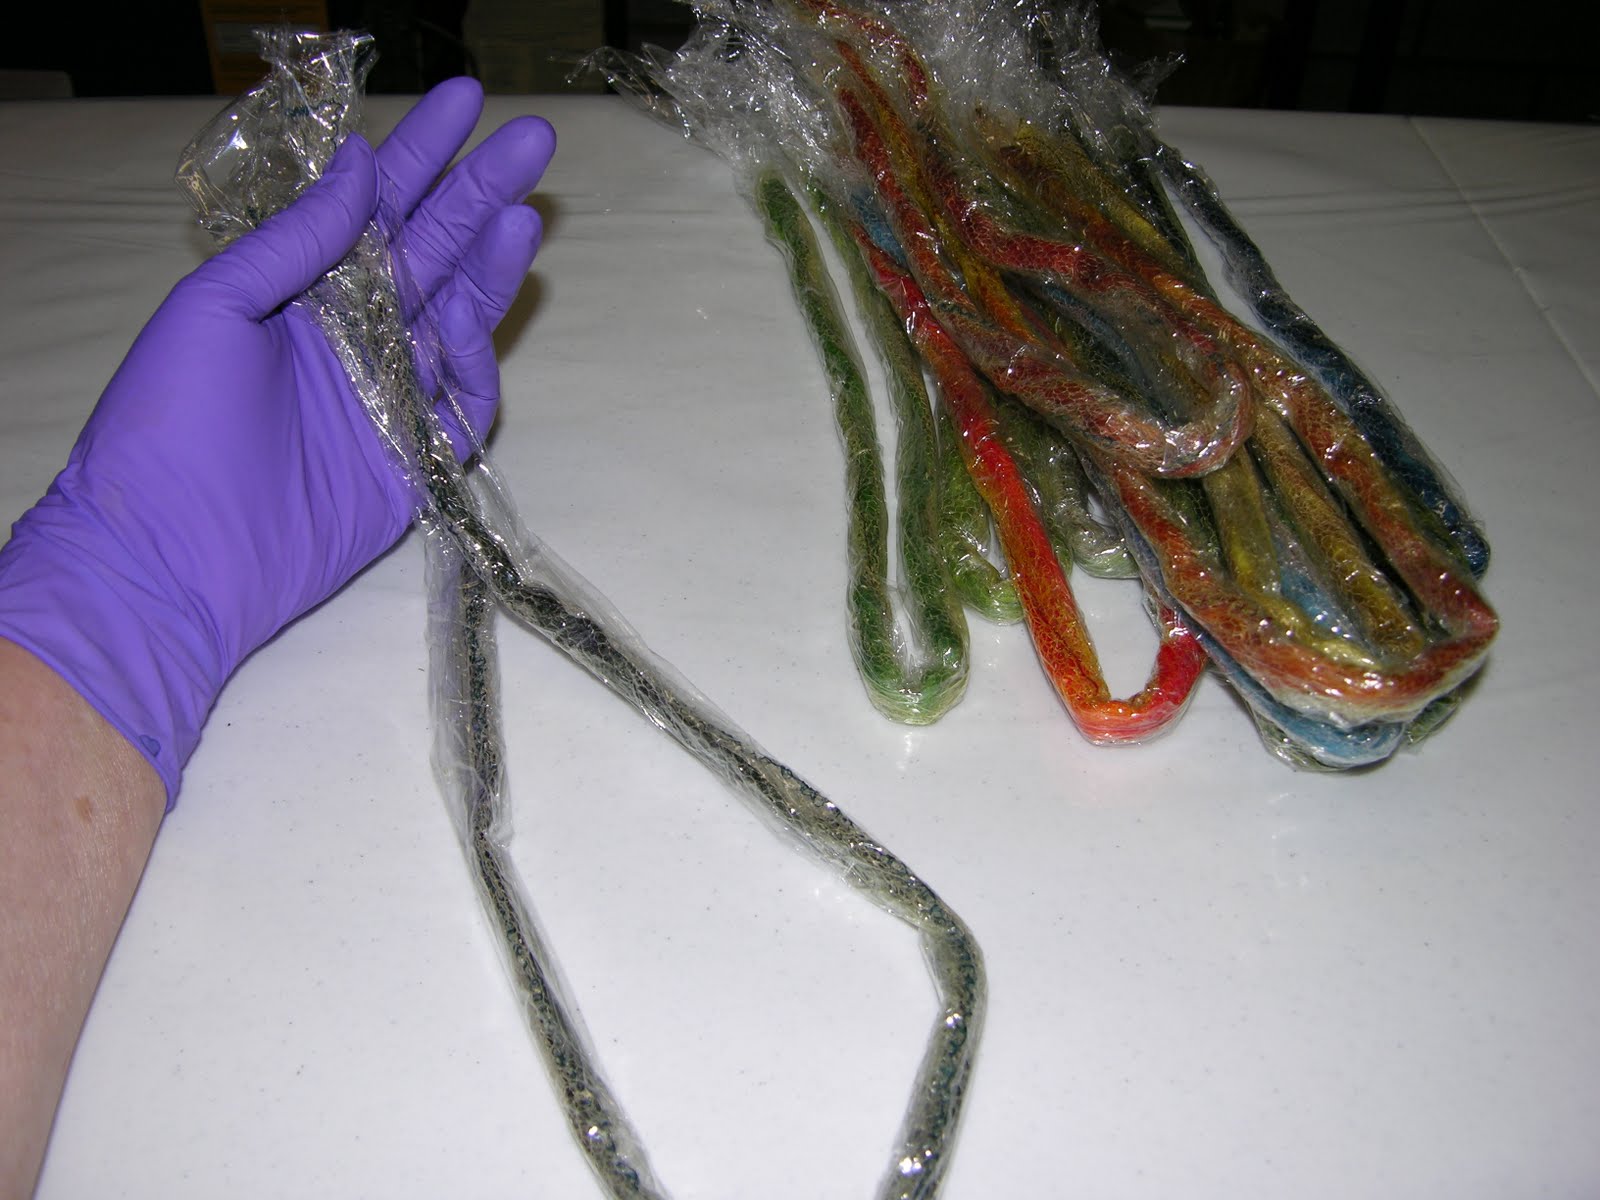
Work from one end to the other, and set the wrapped skein aside.

Using a garage sale glass cake pan or two (or six!), fold the skein in half and then in half again and lay it in the pan. Keep a single layer of floss, though you can pack that layer fairly snugly.

Now we allow that dyed, wrapped floss to cure. You want to put it in a warm place. Because I dye during the summer, I put my glass pans of floss out on the back porch step to cook in the sun. To keep the sun from beating directly on the floss and fading it, I cover it with a piece of dark fabric (which absorbs heat) -- here I'm using garage sale placemats cut to the size of the pan. I like to give the pans a full day of sun. If I put them out in the afternoon, I leave them until the following afternoon. (Watch out for rain, of course.)

When they have been taken in and cooled, carefully remove the plastic wrap from the skeins -- but NOT the nylon net. Now you'll begin the rinsing process. You will find abbreviated instructions for this in many places, and they go something like this: rinse in cold water and then wash in hot water. But I had the good fortune to stumble upon printed material produced by the Jacquard Company, which makes a line of MX dyes. IT said to soak in cold water, then in cool water, then in slightly warmer water, then in slightly warmer water, and THEN wash in hot water.
Bake in the sun, rinse in a series of cool-to-warm rinses -- these two steps changed my work. For the first time I was able to get really, really dense, saturated colors.

You will need bowls to soak your floss. I like to separate the color families and keep the dark floss separated from the light to be certain there's no staining. (Unlike some types of dye, MX rinse water is always colored -- you didn't do anything wrong.) After struggling with piles of odd crockery to accomplish this, I stumbled upon the Wal-Mart aisle full of acrylic serveware in summer colors. It all goes on sale as summer winds down, and I found these three acrylic bowls -- lightweight, nest together for storage -- for $4 apiece. This allows me to separate the color families and move them all together through the rising temperature rinses.

Take your time with these soaks. My first soak is an hour, the second 45 minutes, the third a half hour.

Finally, I wash them in hot water and Synthropol textile detergent (an alternative is Dawn dish detergent). Rinse until the suds are gone, and squeeze them dry.

At this point I remove my cotton skeins from their netting (*carefully* snip one end off and draw the skein out) and open them up so they'll dry all the way through. I hang them to dry on a pasta drying rack (procured from a garage sale, of course).
No comments:
Post a Comment