Thursday, July 29, 2010

The Goal!

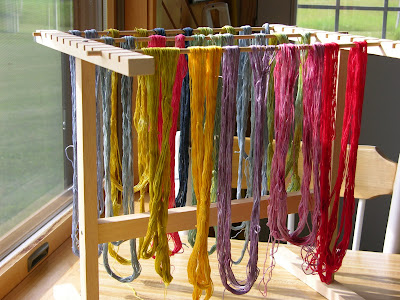
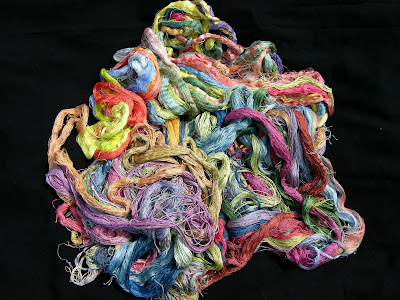
Whew. Enough with the lists, with the procedures, with the blah blah blah. Let's not forget why we're all here. Before we plunge into the actual dyeing, I want to remind us all why we're doing this. Here's some eye candy, some unabashed show and tell of completed work so far this summer.


This is about 2/3 of my cotton floss to date,

ironed and skeined.


And this is my silk,

unironed and unskeined.

(I decided I had autumn to do that part, and

ought to concentrate on the dyeing.)


This isn't brain surgery, friends. It's all produced via simple materials and procedures, using dyes that are marketed as ideal for children to use. You need not be an artist or a scientist to make beautiful threads for yourself. And when you've accomplished this, you will have, in addition to a spectacular stash, some wonderful currency for bartering! Take five of your thirty-yard cotton skeins and break each down into six five yard skeins. Now you have six complete sets of five different colored skeins. You've seen, and will see here some simple weaving equipment put to good use. Make friends with a weaver! Borrow her warping board or umbrella swift, or niddy-noddy for the weekend to prepare your threads, and return it/them with an array of colorful skeins for her own embroidery as a thank-you gift.


Struggle to shop for goodies to include with your cross-stitch exchanges? What about skeins of your own threads? Use your computer's word processing program to design and print lovely hang tags for them: "Threads by (whomever)." Are you familiar with Fish Pepper? Soot? Deadly Nightshade? Apply your own lovely evocative names to the colors you've created and write them on your hang tags.


Ready? Enthused? Let's dye.

Friday, July 23, 2010

Preparation: Dye

Your dye will come from the vendor in small jars of powder. One particularly useful form of MX dye for the beginner is starter kits from Pro Chemical and Dye.
Look for the "Reactive 6 Dye MX Sampler," for example. This has everything you will need to mix up 8-ounce jars of working solutions in six colors. Another option is the MX Dye Sampler/Cool Primaries or the MX Dye Sampler/Warm Primaries. Each of these has four jars -- the three primary colors and black. All three of these samplers are the same price, $10.95, but the Cool/Warm Primaries samplers have twenty-gram jars of dye and the 6 Dye Sampler jars are ten grams. If you're particularly interested in a range of warm colors, take a look at the "Autumn Blend 6 Dye Sampler:" Turkey Red, Tangerine, Rust Brown, Eggplant . . . These sure look like sampler colors to me.

If you know about or are willing to learn about the color wheel and color mixing you can buy fewer jars of dye and mix the colors yourself. It's easy and fun!

In addition to your dyes, you will need a small bottle of Synthropol, a special textile detergent, and Soda Ash (or, as Pro Chemical calls it, "Dye Activator"). You will find these additives are included in any of the Pro Chemical starter kits described above.

All dyes need to be mixed with care. Dry dye in particular must always be respected. This is what well-known dye scientist Dr. Paula Burch says about dry MX dye:

Be careful when you measure out the dye...leave the jars open as short a time as possible, and use a face mask. Don't breathe dye! The stuff isn't very toxic, but you can become sensitized to it, which would put an end forever to your dyeing.
Her website is a treasure trove of information and FAQ's about dyeing of all types. Having the wisdom of an expert like this accessible to home dyers is beyond wonderful. The woman is a goddess, I tell you.

Don't work where you'll be distracted; don't work around children. Use a paper dust mask to avoid breathing the dye powder, and wear gloves. Lay down a newspaper under your work, spritz it with water, and any loose dry dye that falls on it will soak in and stay in place. Some dyers set up a cardboard box on its side with the inside spritzed with water, and mix their dyes inside the box.

How I Mix My Dyes

I work in a basement, and I use my laundry tub for this task. I line the tub with newspapers and spray them down with water. I set my 8-oz. canning jars, with about an inch of room-temperature water in each, on the newspaper down in the tub. I set the dye jars down on the newspaper and have plastic spoons at hand. (Note: if you set the plastic spoons down on the wet newspaper, you will introduce moisture into the jars of dye. Leave them standing up in an empty canning jar.)

I open a jar, spoon out a rounded spoonful of dye, empty it into one of the canning jars and screw the lid back on the dye jar. Then I mix the dye in the canning jar around with the spoon, mooshing it against the inside of the jar -- this is called "pasting" the dye -- to force it to absorb the water. I leave the spoon standing in the canning jar and move to the second canning jar, second spoon, and second jar of dye, and repeat the action. When I'm done with all the jars, I pour water into each jar almost to the rim, stirring as I go. The dyes must be completely dissolved at this point. Then I cap the jar and set the spoon aside to be discarded with the newspaper.

Useful information learned the hard way: Remember that you have spoons standing in jars in that sink, and if you move your hands around indiscriminately, you'll hit the spoons and knock over the jars.

When I'm done, I wipe down each closed dye jar and each closed canning jar with wet paper towels as I remove them from the laundry tub. This will insure I'm not bringing dry dye into the room which could escape into the air. Then I bundle the spoons and the paper towels into the newspapers, creating a package to enclose any dry dye that may remain; throw the package away.

At this point what you have is a set of working solutions; these are safe to work with. You won't need a mask, but you will want to wear gloves to keep your hands from being stained.

Monday, July 19, 2010

Preparation: Cotton

To be dyed, the DMC floss must be wound into skeins. The diameter of the skein and the number of yards in the skein is up to you. I wind a thirty-yard skein. You may wish to wind shorter skeins until you feel more confident about your dyeing skills.

This is a small warping board, the kind of equipment a weaver would have. I wind my skeins on it. You can get the same effect by placing two kitchen chairs together and winding around the tops of the chairs. Once, with no equipment at hand. I wound a warp for a small loom around the knobs of the two dressers in the bedroom, with the warp threads crossing the room like a barrier. When the winding is done, my long weaving warp or your shorter floss skein is tied and removed, and you get your kitchen chairs back!


Here's the completed skein. The next step is to tie it.


This is how you tie a skein so it won't unwind. I've used blue thread here so you can see it clearly, but the actual tie will be in a fine white thread. I commonly use a fine crochet cotton or perle cotton. (What sort of leftovers do you have lying around? Use them!) To tie the skein, you will make a figure eight that weaves through the threads and ties loosely atop them. How many of these ties you put on a skein depends how you want to handle the threads in the dye. I tie two figure eights, one each on opposite sides of the warp.


Then I lay the tied skeins out on strips of nylon net.


I fold the strip of net in half, enclosing the skein, and stitch the packet closed. Some sewing machines will balk at sewing on this flimsy net. I experienced more balking when I sewed a zigzag seam. When I changed to a long straight stitch, which has proven to be quite adequate for the task at hand, the machine calmed down a lot. Experiment.


After stitching, I trim the edges down, and the result looks like this. Cotton on top, silk below. Now I have an easy-to handle package that will take my skein through, in order, washing, rinsing, dyeing, rinsing, washing and rinsing. You can wring the skeins out like a washcloth and they won't tangle or tear! It has simplified things immensely.


Seems like a big investment of time, does it? If you do not stitch your skeins into these nylon net package, you'll need to tie more figure-eight ties on each skein -- six or eight. And you will have to handle them carefully.

Decide how many skeins you will process at once. I do fifteen in a batch. You can space out all the tasks to this point -- wind a few skeins every day, stitch a few skeins into net every day, but from this point on It takes a certain amount of stamina to do all the necessary steps in a row, and you will need to have your wits about you when you sit down to paint your skeins. You don't want to be worn out at that point.

Wash the skeins. I do these in a big bowl in the kitchen sink using Dawn dish detergent. You can also do them in your washing machine, but I'm wary of the stuff in laundry detergent: softeners, brighteners. Dyeing outcomes are changed by virtually anything: the makeup of your water, the additives in your detergent, the temperature of your rinse water after dyeing. The good news is that I've never seen a skein of dyed embroidery floss that was utterly unusable! This isn't like draping the colors over your body and going to the theater -- ugly colors, horrible combinations will find a home in what you stitch, and they will often set off the other colors magnificently.

Hang your washed and rinsed skeins to dry. And at last you are ready to dye!

Saturday, July 17, 2010

Preparation: Equipment and supplies

Safety equipment:
Rubber gloves and disposable dust masks (available from any hardware store). Old clothes or a smock to avoid stains.

A word here about the future if and when you move on to other types of dyeing. Don't generalize the simple safety procedures and equipment we use with innocuous MX dyes to other classes of dye. Working with some types of dye will require special procedures, special gloves and goggles in addition to a dust mask or respirator. Be sure you review pertinent safety precautions!

Containers:
It is necessary that you have a special set of measuring tools and containers just for dyeing. Store these where whey can't be mixed up with your kitchen equipment. Garage and estate sales are immensely useful for acquiring such things.

Watch for measuring spoons and cups -- these don't have to be complete sets. I find 1/4 and 1/2 cups and 1 teaspoon and 1 tablespoon most useful. You may want to watch for pint and half-pint canning jars (to hold your dyes); I used to do this and it was such a pain to wash them and buy rings and discs that now I just buy them new by the dozen from Wal-mart for $7.00 or so; of course you can reuse them over and over (ONLY for dyes, please).


Particularly important are glass bowls and casserole dishes (to soak your floss in dye activator) and glass cake pans (to keep your plastic-wrapped dyed floss warm while it "cures"). It doesn't matter if these are chipped as long as they're not dangerously sharp.


Above: Floss soaking in a glass loaf pan of dye activator; half-pint and pint canning jars holding my dye working solutions.

Look also for small glass custard cups (to mix dye colors) and for big bags of plastic spoons (people keep these surprisingly often, then get tired of washing them).

Veteran garage salers will realize that one doesn't find all these things in a single afternoon. Keep an eye peeled, and alert your garage-saleing friends to your needs.

Paper goods:
You'll want a roll of paper towels at hand and good clingy plastic wrap for wrapping skeins after dyeing.


Thursday, July 15, 2010

Current Work in Progress

We have a small septic system here at our summer place, and I don't pour colored rinse water into it. I thought I was being careful ferrying buckets of rinse water up the basement stairs to dump outside, but the work has been exciting and I was really cranking out the finished product; I hurt my back with the multiple trips. Rats. That has slowed production, I'm afraid.


I've been working on cotton floss, striving to produce colors with subtle variations along the lines of the Weeks Dye Works floss. The final steps in the process are all done rather blindly, and it's hard to tell what you have until the last step, when the finished floss is ironed and skeined, and only then you can see how the subtle striations of color travel through the threads. It's hard to tamp down the urge to pursue the task aggressively until my back feels better.

Wednesday, July 14, 2010

Materials: Dye


The dyes I use are known as "Fiber Reactive," and are sometimes referred to as "MX" dyes. They are THE dyes for coloring cotton, and are doubtless the same dyes used by DMC and other floss manufacturers, as well as by popular small manufacturers of overdyed floss. They are also the dyes used by quilters to do so-called "Low Water Immersion Dyeing" of quilt fabrics.

These dyes are relatively inexpensive, easily procured, completely mixable (so you don't have to buy a thousand colors -- you can mix them!), and easy and safe to use.

Two of my favorite online vendors are Pro Chemical and Dye, in Massachusetts, and Dharma Trading near San Francisco, California. Both of these excellent companies have extensive instruction on their website for the use of these dyes.

Tuesday, July 13, 2010

Materials: Silk


One form of silk I use is 60/2 silk yarn, about the diameter of two single strands of DMC floss. I buy mine on Ebay from a factory in India. Their Ebay store is called Silks Unique Traditional. The quality and price are excellent, the postage reasonable, and the factory rep speaks fluent English. 100-gram hanks of 60-2 silk are slippery and tangly and difficult to handle unless you have winding equipment (a swift, e.g.) and experience. The company is now offering this size on spools, which will be much easier to wind skeins from.

A drawback of 60/2 silk is that it is less resistant to abrasion than strands of fine floss. I use these stitching rules with ALL forms of silk, but they are particularly important with 60/2: work with shorter strands and use a larger needle which will open a wider hole in the linen for the silk to pass through. Cross-stitch expert Susan Greening Davis recommends a 22 or 24 size needle, and adds that it'll be like using a pickax for the task until you get accustomed to it. I use a 22.


A second type of silk I use is six-strand floss. It's hard to find. My only source for undyed high-quality six-strand floss in small quantities is Treenway Silks in Canada. They sell a 100 gram (3.5 oz.) skein for $23.80 (Canadian dollars). Postage from Canada is steep, so if you buy two or three skeins, the ultimate cost per dyed small skein will be lower.


Materials: Cotton


I work with DMC blanc (white) floss. Cones of various sizes can be purchased here and there, but I've found the best value for retail purchase is the 500-gram cone (1.1 lbs.). I can wind around 75 thirty-yard skeins for dyeing from a single cone.

I buy mine at JoAnn.com. It is useful to sign up for the JoAnn e-mail notices, for these frequently contain coupons and specials. I find the company will sometimes run very short-term special offers, such as free shipping, and the only way you will know about them is via the e-mail notice.

The usual retail price on the 500-gram cone is around $35. This past July fourth weekend the website had a short sale: free shipping on any purchase over $40, and cross stitch supplies were all 40% off. I bought two cones, and this will keep me supplied for months to come.

Sunday, July 11, 2010

A Dye Story


This is the chronicle of ongoing summer experiences dyeing my own embroidery threads for Wisconsin winter cross-stitching. I'm a retired teacher and have dyed my own woolen handspun yarn for some forty years; extending that experience to cotton floss and silk seemed like a natural next step. It's been an adventure!

I'd like to share with you what I've learned, what I buy to work with, what colossal mistakes I've made (complete with accompanying embarrassing pictures). It's all been great fun, and dreary winter hasn't been the same since. Stitching with your own dyed thread is like revisiting old friends.

What this blog isn't: a guide to setting up your own dyeing business. I don't keep elaborate logs of dyelots and dye recipes; I don't seek to reproduce anything I've done. I dye thirty-yard skeins: That's a suitable dyelot for my humble purposes. Everything I will show you and discuss addresses a single stitcher making her own stash. The methods I use have been designed for simplicity and fun, and bear no resemblance whatever to authentic commercial production. In fact, one of the results of these adventures is a profound respect for professionally-dyed products.

C'mon along, and let me share the story with you!